
This is the first of a 3 part series on building the outdoor kitchen that you see above.
In this first post we will take a look at the block work
and forming and pouring the concrete countertop.
Please read on.
This 3 part series to date:
Please read on.

This project started out as a need to build a retaining wall
for a last section of our yard that had an eroding bank.
Being the type of person who likes to combine projects and specific building needs
I thought why not combine this with an outdoor utility sink
for potting plants or washing vegetables where the water could be recycled
for adjacent fruit trees in our high desert yard.
Oh yeah, and I had always wanted to try building a concrete countertop with an integral sink.
If it was a utility sink outside it wouldn't need to be a perfect job
like I would want if it was in our indoor kitchen.
This would be a perfect project to experiment on.
I have long admired the cement counters, sinks and wash basins
that are prevalent all over Mexico.
And finally, why not roof it in and build an outdoor kitchen
since this area was right outside our house on the patio near our indoor kitchen.
It is in a nice shady spot for hot summers, provides protection from wind and rain,
and would be a great spot for the grill, if we had a grill,
(instead it is an easy and convenient place to store our solar oven,
for more please see the previous post-

As is my usual procedure,
I set the first course of 6" blocks in the wet concrete stem wall, level, with vertical rebar.
The next 3 courses were dry stacked with all the cores filled with concrete.
Surface bonding cement was applied to the outside.
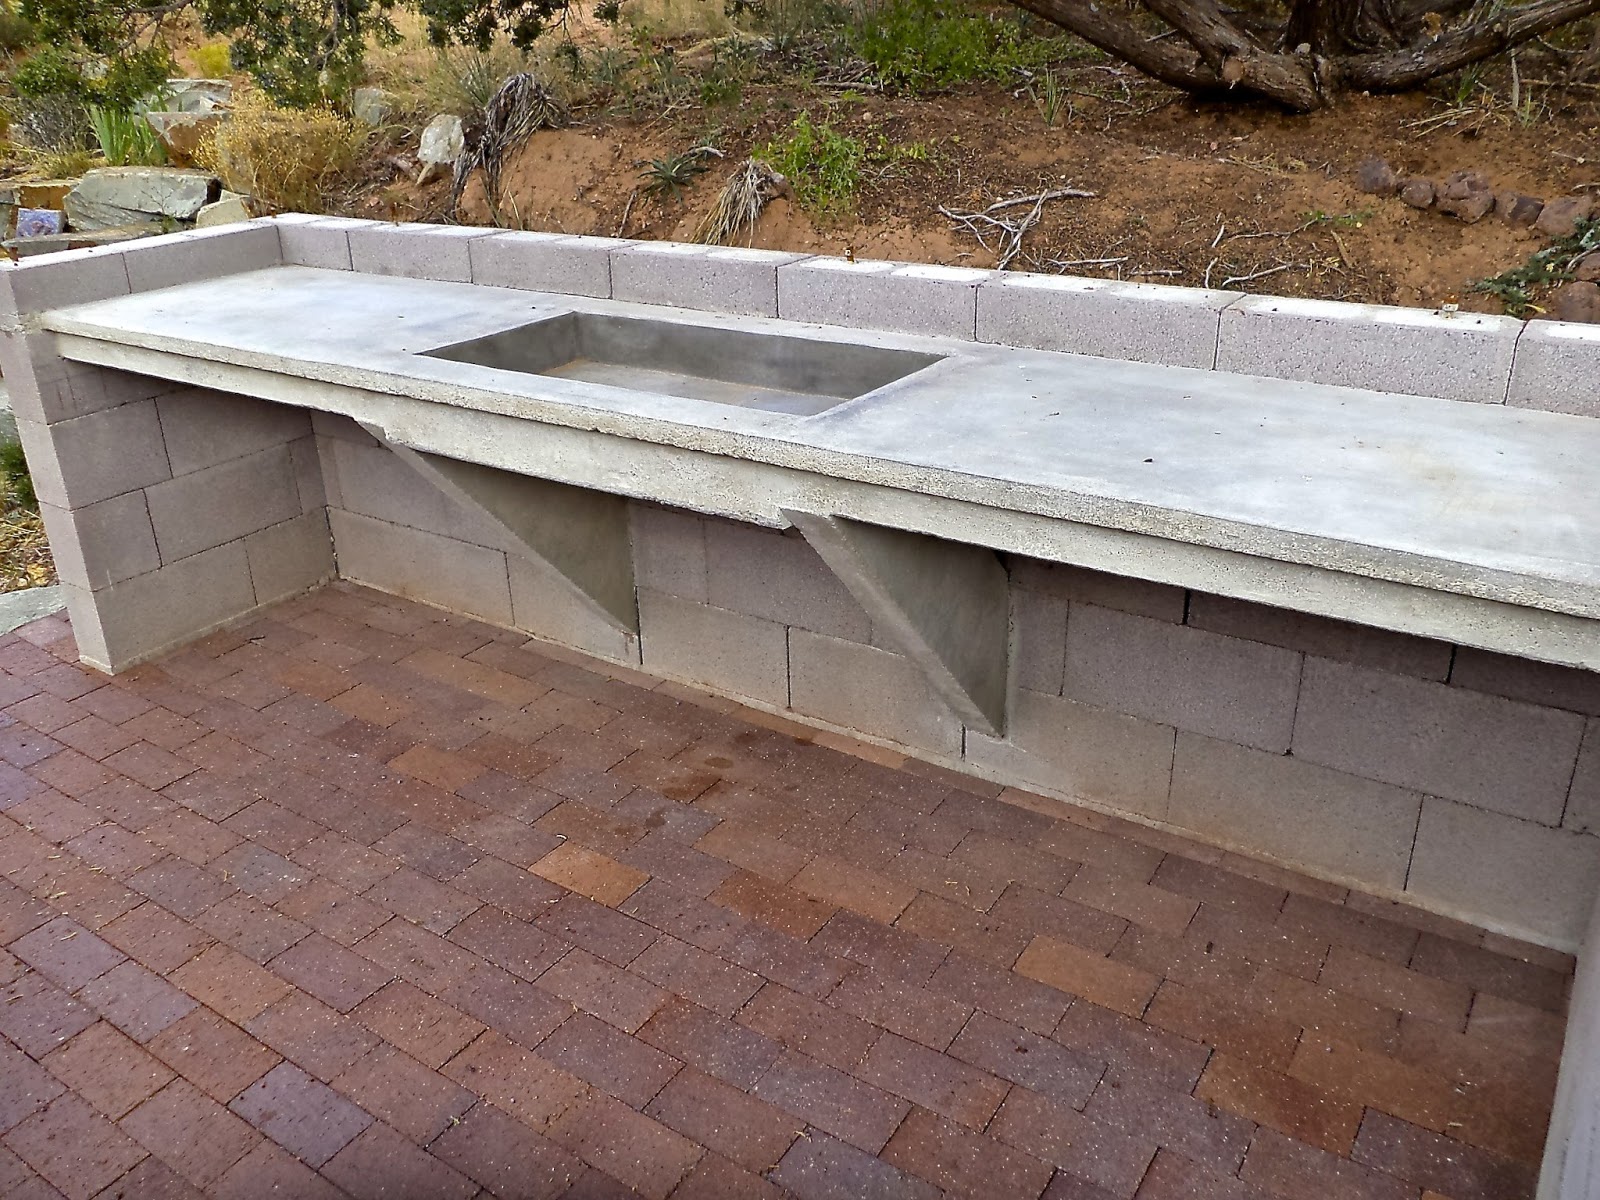
As I planned the concrete counter I realized it would have a span of 9 1/2'.
Most concrete counters lay on cabinets with continuous support.
This would need to be self supporting along the front.
I also realized this would need to be cast in place because of the size
and the fact that I wanted an integral sink.
Most concrete counters are cast upside down in a shop ensuring that they have a smooth surface
as a result of the melamine form material that is commonly used.
Allison and I combed the internet looking for help and there is a lot there.
The biggest help came from Buddy Rhodes Concrete Products.
He builds concrete counters as well as markets the mixes and other products.
He also has some excellent videos and this one was particularly helpful:

The forms (above) are mostly built out of 3/8" construction grade plywood and rough 1" lumber.
The counter and sink are 2" thick with a 3"x 4" beam along the front
and two 3" wide diagonal supports to carry the load to the block wall on either side of the sink.
I divided the forms into 5 sections with the sink in the center and a counter on either side,
and two diagonal supports on either side of the sink.
In the photo above I am fitting the counter sections in place for the first time,
with one diagonal in place and the other laying on the ground.
The bottom of the sink section is laying on the counter in the upper left.
I cut out holes in the cement block to integrate the sink better to the wall,
and shoulders have been cut into the wall at the bottom of the diagonal
to provide a better grip for the diagonals.
In designing the forms it is very important to make sure they can be dismantled
after the concrete has been poured and set up.
I could have done a better job at this but fortunately I didn't have too much trouble.
We also used boiled linseed oil on the inside of the form before the pour.

Above you can see the forms have been set up
showing the beam that runs along the front with a 2" nosing (right side).
I used two strands of 1/2" rebar for the beam and 3/8" rebar for the diagonal.
Also 2 strands of 3/8" rebar were set over the block wall.
As you can see the counter will extend over the wall
making the whole thing one integral masonry unit.

We used 1/2" hardware cloth for the 2 counter sections and around the sink
that were dropped in place during the pour.
We used XPS foam cut outs for the eventual faucet location and for the sink drain,
and a yogurt container lid provided a recess for the drain.
You may want to get your drain piece before the pour
to make sure you have one that will accommodate the thickness of your concrete.

Above is the metal reinforcement "basket" for the sink with the sink form
both of which are set in during the pour.
The cross bars over the form suspend it to the proper height as it is put in place.

In the above photo everything is set in place to check for the proper fit.
Of course the sink basket and form will be removed before the pour
until the concrete for the bottom of the sink has been placed.
We started the pour with the diagonals and sink and worked up to the height of the counter.
Note how the countertop extends over the wall.

Underneath I was particularly concerned about the diagonals being pushed out of place
by pressure from the concrete as it was vibrated into the forms.

Scrap lumber was used to give the form plenty of support from underneath.
And the pour is done.
I set a last row of half thickness blocks into the wet concrete,
(which will become the backsplash),
with the cores filled and anchor bolts set.
We kept everything wet for several days after the pour to help the concrete cure.
Even though things worked out okay and it was my first time at this
I was not particularly happy with the pour for several reasons:
- I had read not to make the size of the aggregate
more than 25% of the thickness of the counter so we used 3/8" gravel-
that was either too large or I used too much.
It may be better not to use any aggregate, just a coarse sand.
More research is needed on that point.
Pay careful attention to your mix.
- Because I wanted a stiff mix for the strength
it turned out to be too hard and slow to fill the forms and have time to trowel a finish.
Two people could have worked the forms while another mixed.
- Because I was mixing and setting the concrete with Allison's help,
it was still difficult to get to the finish in a timely manner.
All in all, it came out fine for an outdoor sink,
but it would be a bit rough for inside the house.
Also we did do some light sanding but more sanding would have helped the finish.

I had hoped to give the bottom of the sink a good slope for drainage
but that was harder than I expected.
We ended up going over that area with a premixed concrete patch kit,
as well as patched any tiny holes in the surface.
We have thought about tiling the bottom of the sink but so far have not.
We like the shallow depth (4") as it makes a nice work height.

Structurally the project came out very good.
There are two minute non-structural cracks in the countertop
but I expected those and they are very hard to see.
The voids in the back of the diagonal supports are for the waterlines and drain lines.
This 3 part series to date:
Thanks for reading.