In this post on building our wall, after having looked at how we put the metal cap on in the last post,
I want to now look at the standing seam hip roof that will protect the yet to be built gate.
All of the posts to date are:
Building An Adobe Wall: #4 Putting On The Cap,
Building An Adobe Wall: #5 Hip Roof For The Gate,
Building An Adobe Wall: #6 Plastering And Creating The Designs,
Building An Adobe Wall: #7 One Year On And A Companion Fence.
Building An Adobe Wall: #5 Hip Roof For The Gate,
Building An Adobe Wall: #6 Plastering And Creating The Designs,
Building An Adobe Wall: #7 One Year On And A Companion Fence.
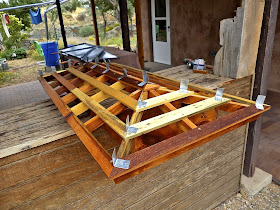
Above you can see the frame of the roof that is constructed much like any hip roof only in miniature.
I built the frame and put on the metal pans in the shop
so the roof was complete when it was installed over the gate opening.
As with all the wood used in this project we relied on reused lumber saved from the dump
out of a building that was being torn down.
The metal tabs will be bent over at the standing seams to hold down the metal panels (or pans)
that are just visible in the background right behind the frame (above).
The pitch of the roof is 4" in 12" and is the standard pitch that I normally use,
and also quite common in this area.
I personally don't mind the look of the metal underneath
and the spacing between the purlins allows condensation to easily dry out.
Condensation on the bottom of the metal occurs when warmer moist air condenses on the cold metal.
In our high desert climate this is most common in the winter.
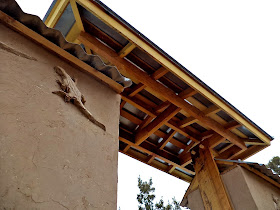
The frame that you saw in the second photo above is now notched and pegged to the extended jamb.
I have made myself a student of the hip roof for the last 20+ years
so working in miniature was a lot of fun and so much easier.
The frame that the rafters are screwed to is rabbeted, glued, and nailed with galvanized finish nails.
The rafters, ridge, and purlins are screwed with pilot holes to avoid splitting the wood.
The fascia is glued and nailed.
You can just barely see in the above photo the screws
that hold the drip edge of the metal pans to the bottom purlin.
They work with the tabs that you saw in the second photo of this post
to hold the metal roof firmly in place.
I made long narrow V shaped pieces of metal that I crimped onto the 1" high standing seams
and used rivets to hold them in place.
In the next post we will look at plastering our wall and how Allison made the designs on the wall.
All of the posts to date are:
Building An Adobe Wall: #4 Putting On The Cap,
Building An Adobe Wall: #5 Hip Roof For The Gate,
Building An Adobe Wall: #6 Plastering And Creating The Designs,
Building An Adobe Wall: #7 One Year On And A Companion Fence.
Building An Adobe Wall: #5 Hip Roof For The Gate,
Building An Adobe Wall: #6 Plastering And Creating The Designs,
Building An Adobe Wall: #7 One Year On And A Companion Fence.


